With my family living on the other side of the ocean, the current state of the weather is an unavoidable topic of conversation. Tired of the constant questioning about how snowy it is in Canada, and in part also to help them feel a little bit more connected to me, I decided to set up a webcam stream showing the view from my front window. For some reason, I expected this to be a very easy thing to do in the current age of live streaming. Turns out that if you want to go anywhere beyond a simple straight feed, it's not that easy.
First attempt: MJPEG
I've been a long time user of the motionEye project: it's a very convenient frontend for the motion daemon, an open-source project that performs motion detection on a variety of video streams, from mjpeg cameras, to RTSP sources, to webcams connected via USB. As part of this, it also re-encodes and serves every input source as separate streams, which allows it to "normalize" all the different incoming formats into something that most browsers can easily and natively display.
For my initial setup, I used a Microsoft Lifecam HD-3000 connected to a Raspberry Pi Zero W. Given the low specs of the Zero, the video capture options are quite limited. Fortunately, it's incredibly easy to download, compile, and install mjpeg-streamer, a tool built specifically for embedded devices with few resources. The build process definitely takes a while (the Zero is only as powerful as the 8-year-old Pi Model A) but it succeeded on the first try without a hitch, and within minutes I could see the mjpeg stream at http://pizero:8085/?action=stream.
I added this as a new camera to motionEye, which runs on my R710 server under the stairs. Even if the Pi Zero was already streaming mjpeg video, going through motionEye takes away the load of serving the final stream to multiple viewers from the poor little Pi. Plus, it can overlay a nice timestamp and label to the feed!
Not willing to expose my home server directly to the Internet, I decided to pipe the port to my VPS, where I have an instance of Traefik acting as a reverse proxy to all my services.
ssh -fNT -R 172.17.0.0:10000:localhost:10000 vpsWhen executed on my local server, this does the following:
-f: switch to the background after establishing the connection-N: don't execute a remote command (there's nothing to execute in this case)-T: don't allocate a pseudo terminal, since we have no interaction to perform-R 172.17.0.0:10000:localhost:10000: allow the172.17.0.0interface to connect to port10000on the remote server, and direct those connections to port10000onlocalhost.This is called a reverse tunnel, because it's allowing a remote host to connect to a local port through ssh.vps: the alias for my VPS in the~/.ssh/configfile
In short, after launching this command, connecting to localhost:10000 on the VPS would actually connect to localhost:10000 on my R710. I specified the 172.17.0.0 interface in the command because I only want the Docker network stack on the VPS to be able to access the port, as that's where Traefik is running.
To allow Traefik to redirect to the local port, we must add backend and frontend rules pointing to port 10000 on the host, which is at 172.17.0.1 on the Docker network.
[backends]
  [backends.webcam]
    [backends.webcam.servers.server1]
    url = "http://172.17.0.1:10000"

[frontends]
  [frontends.webcam]
  entryPoints = ["http", "https"]
  backend = "webcam"
  passHostHeader = true
    [frontends.webcam.routes.route1]
    rule = "Host:webcam.example.com"
There! With this configuration, going to webcam.example.com would directly show the MJPEG stream from my home motionEye instance.
Perfect! Except for a lingering question...
What temperature is it?
Ah, of course. Being able to see the weather is only half the conversation! The other half is being able to know just how cold it is on this side of the pond, so my dad suggested that it would be very cool if the stream also showed the current temperature.
Unfortunately this is an aspect where motion is kind of lacking. The only possible overlays are a static string (changing it requires restarting the daemon, with a temporary loss of stream data) and the current date/time.
I liked the MJPEG approach for its simplicity, but this was a sign that it was reaching the limit of its usefulness, not to mention the fact that it's incredibly inefficient in terms of bandwidth! It is, after all, just a series of jpeg images.
Whenever I have to do something video related on a Linux machine, there are two candidates that immediately come to mind: ffmpeg and gstreamer. They both offer extensive transcoding options, together with some pretty advanced filters.
My task was pretty simple: I wanted to extract the external temperature value from my Home Assistant instance via HTTP, and display it on top of the stream. While ffmpeg can do this, the implementation would have been somewhat clunky and not very flexible, so I decided to completely change my approach.
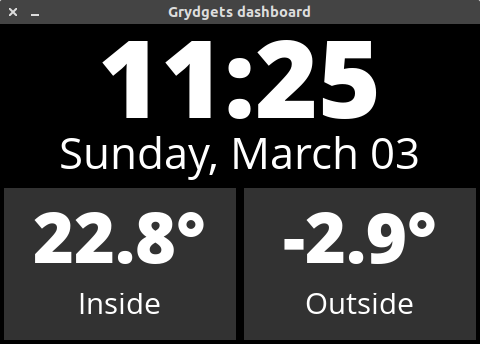
I recently built a dashboard system called Grydgets to turn an unused Raspberry Pi into a pretty clock for my living room, so I already had something nice that could show all the information I wanted, and I just needed to overlay it on the stream!
Headless X windows
My R710 is running Ubuntu Server, so there is no graphical environment for Grydgets to render to, but this can easily be solved with Xvfb, a virtual X server that creates a framebuffer in memory.
Xvfb :99 -auth /tmp/xvfb.auth -ac -screen 0 480x320x24+32 -listen tcpThis creates a virtual X server with ID :99, one virtual screen at a resolution of 480x320, and authentication options that allow for remote connections.
ffmpeg can then very easily capture data from the virtual framebuffer with these parameters:
-f x11grab -video_size 480x320 -r 30 -i :99In this specific case, the framerate parameter behaves slightly differently from other ffmpeg inputs: normally it represents how fast ffmpeg actually reads from the source, which means that specifying a frame rate of 30 for a 60fps input video will make it play at half speed. In this case, however, the parameter indicates how often ffmpeg should sample the framebuffer, so it doesn't alter the actual speed of the source video.
ffmpeg streaming attempt 1
Given that ffmpeg doesn't easily support mjpeg streaming via http (and I was targeting at least 30fps), I decided to leverage YouTube Live as a sink for the feed. The final pipeline looked something like this (spoiler alert — this didn't work properly):
ffmpeg \
-thread_queue_size 512 -r 5 -i http://localhost:10000/ \
-thread_queue_size 512 -f x11grab -video_size 480x320 -r 30 -i :99 \
-filter_complex "[1]scale=iw/2:ih/2 [pip]; [0][pip] overlay=main_w-overlay_w:main_h-overlay_h" \
-f lavfi -i anullsrc=channel_layout=stereo:sample_rate=44100 \
-c:a aac \
-c:v libx264 -preset ultrafast -tune zerolatency -threads 4 -maxrate 2000k -bufsize 2000k -r 30 -f flv \
'rtmp://a.rtmp.youtube.com/live2/[SECRET-KEY]'
Let's go through the options:
-thread_queue_size 512 -r 5 -i http://localhost:10000/: this specifies the first input file. The value for the size of the thread queue was a matter of trial and error. ffmpeg would complain about it being too small, so I just tried bigger values until it stopped complaining. Science!-thread_queue_size 512 -f x11grab -video_size 480x320 -r 30 -i :99: once again, this is an input specification. The-iparameter tells ffmpeg which X server to talk to, defaulting to screen0.-filter_complex "[1]scale=iw/2:ih/2 [pip]; [0][pip] overlay=main_w-overlay_w:main_h-overlay_h": despite the name, the filter is actually not too complex. This is what we're telling ffmpeg:- take input number 1 (the X capture), scale it to half its size on both dimensions, and put the result in a stream called
pip - take input number 0 (the webcam) and the input called
pip(the scaled X capture), and pipe them to theoverlayfilter, where they're automatically namedmainandoverlay - superimpose the
overlaystream on the bottom right corner of themainfeed
- take input number 1 (the X capture), scale it to half its size on both dimensions, and put the result in a stream called
-f lavfi -i anullsrc=channel_layout=stereo:sample_rate=44100: create a fake sound input at the given sample rate.-c:a aac: encode the sound using AAC with the default options-c:v libx264 -preset ultrafast -tune zerolatency -threads 4 -maxrate 2000k -bufsize 2000k -r 30 -f flv: encode the final video stream in the H.264 format, using 4 threads, at a maximum bit rate of 2mpbs, with a 2mb buffer, a framerate of 30, and wrapped in anflvcontainer.
Fixing variable framerate streams with ffmpeg
While at a glace this appeared to be working fine, I was only capturing the webcam at 5 frames per second. Like I explained earlier, for "real" streams this meant that ffmpeg was actually reading the webcam input at 5 frames per second, causing all sorts of issues with the output video. The webcam would look sped up, as ffmpeg tried to readjust the output to 30 frames per second, but would soon run out of footage as the mjpeg source was only streaming at 8/9 frames per second.
Adding the -re option to the webcam input to tell ffmpeg to stream it in real time didn't change anything, as the resulting video would be captured "correctly," but now ffmpeg wasn't able to produce 30fps content, as the low frame rate of the MJPEG source was making it lag behind.
As I said, MJPEG is a very weird format that literally consists of an endless series of jpeg images one after the other. In a live-streaming scenario the host simply sends them as fast as it can, but there is no guarantee of consistency in the rate at which they images are produced, which means that the resulting framerate is not consistent.
While ffmpeg has a filter, aptly called fps, that is supposed to drop/copy frames of the source video to "convert" it to a specified frame rate, because of the quirks I mentioned it simply does not work with MJPEG sources: ffmpeg would just fill up its buffer, then start producing output at 30fps, and assume that that was the frame rate of the MJPEG feed.
This is when I started banging my head against the wall.
After an incredibly long amount of time, I finally found a page that had an explanation and a solution for the issue.
ffmpeg has an obscure parameter called -use_wallclock_as_timestamps that will solve exactly the problem I was having: it tells the system to simply count the amount of frames it can capture from the source within a 1-second interval, and use that as the fps value.
Since this applies to the whole instance of ffmpeg, however, we have to pre-process the webcam input separately, or we'll end up creating issues with the X capture.
Putting it all together
Here is the final pipeline that merges all the parts together:
ffmpeg -v quiet \
-use_wallclock_as_timestamps 1 \
-re \
-i http://localhost:10000/ \
-c:v rawvideo -vf fps=30 -f nut -  | \
ffmpeg -v quiet \
-thread_queue_size 512 -r 30 -i - \
-thread_queue_size 512 -f x11grab -video_size 480x320 -r 30 -i :99 \
-filter_complex "[1]scale=iw/2:ih/2 [pip]; [0][pip] overlay=main_w-overlay_w:0" \
-f lavfi -i anullsrc=channel_layout=stereo:sample_rate=44100 \
-c:a aac \
-c:v libx264 -preset faster -tune zerolatency -threads 8 -maxrate 4000k -bufsize 4000k \
-f flv '[URL]'
Here's what's new in the first part of the pipeline:
-re: now that ffmpeg can properly calculate the fps of the feed, we use this option to capture the video in real time, just as fast as the Pi can serve it-c:v rawvideo -vf fps=30 -f nut -: here we tell ffmpeg to keep the video in a raw format, convert it to 30fps by duplicating frames when necessary, encapsulate it in thenutformat, and send the output data to standard output by using-as the file name
The data output from the first instance is then piped into another instance:
-thread_queue_size 512 -r 30 -i -: we now tell ffmpeg to read the first stream from standard input, at a frame rate of 30fps
Everything else otherwise looks the same.
And there it is!